
Kickout flashing, also called diverter flashing, is a small angled piece of metal or molded plastic installed where a sloped roof ends against a vertical wall. It catches the water running down that roofline and kicks it out into the gutter instead of letting it run behind siding. Without it, that water soaks the wall, often out of sight. In Baton Rouge, where heavy downpours are routine, it is one of the cheapest details on a roof and one of the costliest to leave out.
TL;DR
- Kickout flashing sits at the lower end of a roof-wall intersection and diverts runoff into the gutter, away from the wall.
- When it is missing, water concentrates at one spot on the wall and can rot trim, sheathing and framing with little visible warning.
- A proper install is integrated with step flashing, the roof underlayment, the housewrap and the siding. A loose add-on piece or a caulked-on bend does not do that job.
- It can be added to an existing roof, as a stand-alone repair or during a replacement.
- If you see staining below a roof-wall corner, a gutter that overflows there, or flashing that has lifted after wind, have it inspected soon.
Table of Contents
- What kickout flashing is and where it goes
- What happens when kickout flashing is missing
- Kickout flashing leaks: the common causes
- Is kickout flashing required?
- How kickout flashing is installed correctly
- Can you add kickout flashing to an existing roof?
- Why flashing lifts in wind, and what to do about it
- Checking whether the wall and roof need repair after a leak
- Our perspective on kickout flashing
- Get your roof-wall intersections checked
- Questions homeowners ask about kickout flashing
- Sources
What kickout flashing is and where it goes
Picture a two-story house with a lower roof that runs into the side wall of the upper story. Rain falls on that lower roof and runs down the slope. Along the wall, step flashing guides water down the roof surface. At the very bottom of that wall line, where the roof edge and the gutter meet, the water has to go somewhere. Kickout flashing is the piece that gives it a path.
The diverter turns the stream outward and drops it into the gutter. Without it, the water follows the wall. Building science guidance explains that in big storm events rainwater can overflow the gutter and stream down the walls, and properly placed diverters send that water into the gutters rather than into wall cavities.
You will find kickouts at these spots:
- Where a lower roof eave meets the side of an upper story
- Beside a dormer where the roof edge ends at a wall
- At a garage roof that butts against the main house
- At porch or addition roofs that tie into an existing wall
It is a small part, often only a few inches long. The consequences of leaving it off are out of proportion to its size.
What happens when kickout flashing is missing
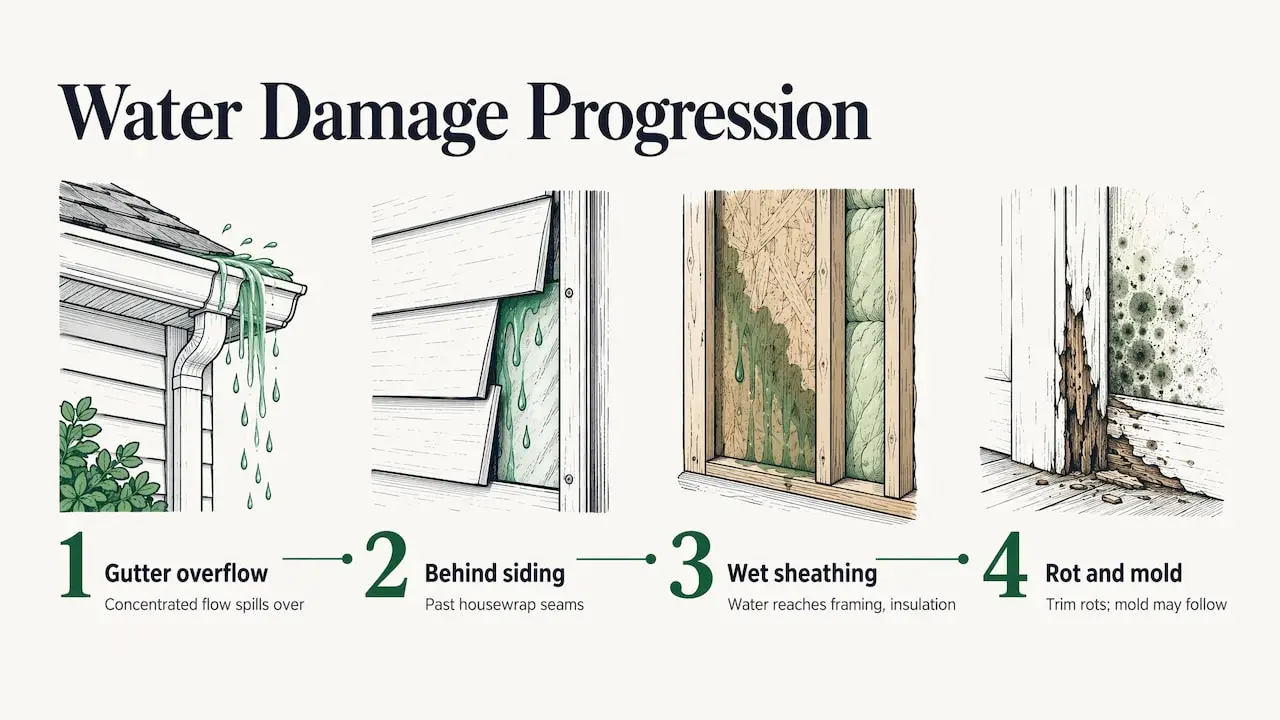
The pattern is consistent. Water that should enter the gutter instead runs down the wall surface at one point. Over months, it works behind the siding, past the housewrap seams and into the sheathing.
Federal building guidance for DIY inspection notes that where a roof meets a wall on a multi-level house, missing kick-out flashing can cause concentrated flow that overflows the gutter, stains the wall, and eventually rots trim and overwhelms window flashing. The Building America resource guide adds that when diverters and sidewall flashing are inadequate or not integrated with the water-resistant barrier and cladding, water can reach sheathing, framing and insulation, and mold can follow.
The tricky part is that you may not see it. Home inspectors’ professional association InterNACHI states that severe damage may exist with little or no visible evidence, so a clean-looking wall does not prove all is well. This matters in our climate. Louisiana’s humidity keeps wet wall materials from drying out, so a slow leak that might dry in a drier region can linger.
Signs to look for
From the ground, with a flashlight and binoculars if you like, check the corner where each roof meets a wall:
- A vertical streak or dark stain on the siding or brick below the roof edge
- Paint that bubbles, peels or blisters near that corner
- Soft, swollen or darkened trim and fascia ends
- Gutter overflow at that exact spot during a heavy rain
- Stained ceiling or drywall inside the room behind that wall
- A musty smell or visible mold in a closet or corner of that room
If you spot any of these, do not wait for the next storm to find out how bad it is. A roof inspection that includes the wall-side of the roof can trace the water to its source. Our roof inspection service looks at these intersections as part of a full roof check.
Kickout flashing leaks: the common causes
A kickout that exists is not always one that works. InterNACHI lists the common installation-related causes: a kickout never installed, a bottom seam that is not watertight, or an incorrect diverter angle, which it says should never be less than 110 degrees. It also notes that homeowners sometimes modify kickouts, for example by shortening the height or cutting them flush, which reduces how well they work.
Here is how those problems show up in practice:
| Problem | What it looks like | Why it leaks |
|---|---|---|
| Never installed | Roof shingles end at the wall, gutter sits below | Runoff has no diversion and runs down the wall |
| Undersized or site-bent piece | Short, thin metal with open corners | Overflows in heavy rain, seams let water through |
| Open or unsealed bottom seam | Gaps at the folded corners | Water passes through the diverter itself |
| Wrong angle | Flat or shallow kick | Water doesn’t clear the wall and drips back |
| Not tied into housewrap and siding | Siding butts the flashing with caulk only | Water gets behind the cladding at the top edge |
| Cut down or removed during gutter or siding work | Stub of flashing remains | Reduced diversion, often unnoticed |
The federal building science guidance also points out that kickouts can be prefabricated as seamless molded plastic or as metal with welded seams, whereas a piece bent on site from sheet metal can end up undersized with unsealed seams that leak. That is a good reason to ask what type of kickout your roofer plans to use and how it will tie into the wall.
Is kickout flashing required?
In most of the country, building codes call for it. The model residential code language in the 2015 International Residential Code, as reproduced in the Minnesota Residential Code, says kick-out flashing must be installed to divert water away from where a sloped roof eave intersects a vertical sidewall, and that it must be a minimum of 2½ inches long. Building America’s guidance on step and kickout flashing references the 2009 through 2018 IRC for these details.
Codes differ by state and parish, and local amendments change. For a specific Louisiana address, the parish or city permit office has the final say on which code edition applies. Whatever the code minimum, we install kickouts on every roof-wall intersection that needs one because the cost of doing so is small compared with opening a wall later.
How kickout flashing is installed correctly
A kickout is not a standalone gadget. It is the last piece in a sequence, and the order matters because each layer laps over the one below it, shingle fashion.
Building America’s resource guide describes the core sequence. Roof felt or underlayment goes in before the step and kickout flashing. Step flashing extends at least 4 inches up the wall and 4 inches out along the roof deck and is integrated with the drainage plane above, for example by overlapping the housewrap. The kickout goes at the end of the intersection, large enough to handle expected stormwater flow. For metal flashing, the same guidance says galvanized steel should be at least 0.019 inches thick under the 2015 IRC.
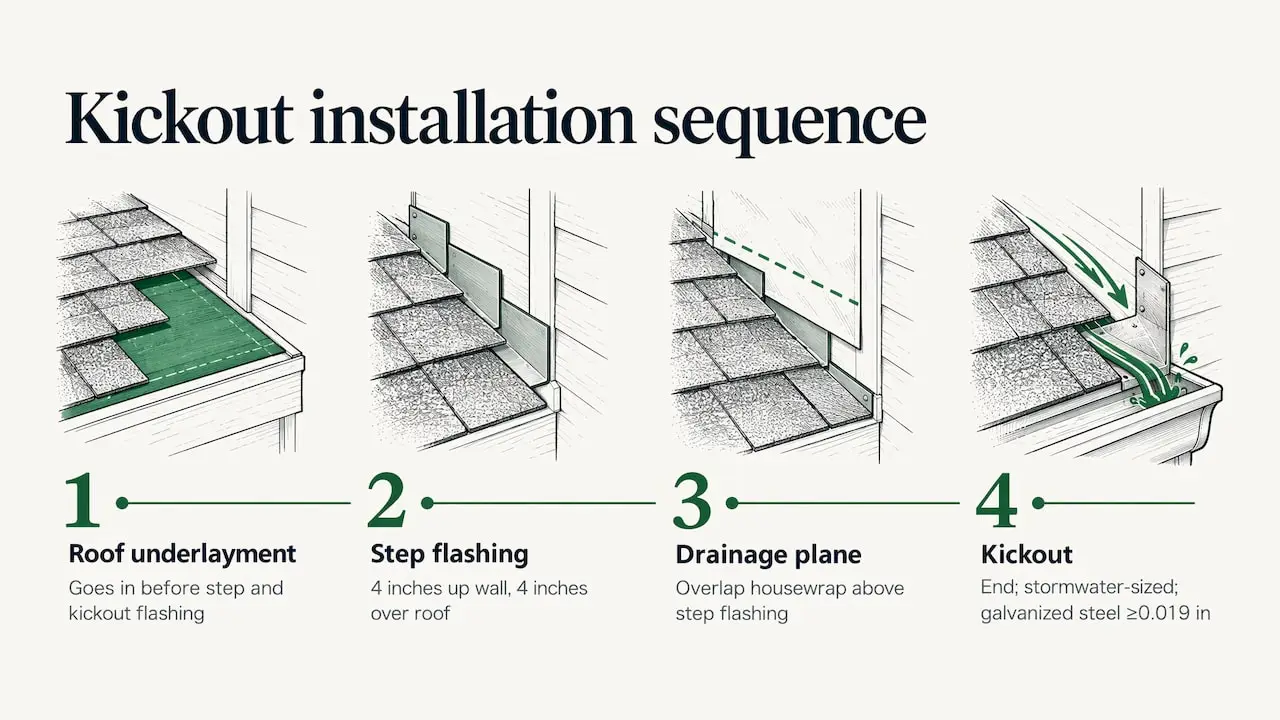
Trade advice follows the same logic. Fine Homebuilding describes lapping the roof underlayment up onto the wall, installing a diverter to send water into the gutter so it does not channel behind the siding, and then laying the housewrap over the top of the kickout and step flashings.
What we look at on a job
- The wall above. Is the housewrap intact, and can it be lapped over the flashing? Is the siding cut back with a clear gap above the roof?
- The step flashing. Is each piece lapped correctly and long enough?
- The kickout itself. Correct size, correct angle, sealed seams, set so water lands in the gutter and not past it.
- The gutter. The kickout only works if the water falls into a gutter that can take it. We check the gutter’s position, slope and the downspout capacity at that corner.
- The wall interior side. If a leak has already happened, we check for soft sheathing before closing it up.
That last step is where honest assessments matter. We would rather tell you plainly what we find behind the siding than patch over it.
Can you add kickout flashing to an existing roof?
Yes. Building America’s guidance on existing homes states that kick-out and step flashing can be done as a stand-alone retrofit measure as well as part of a roof replacement. Because a proper kickout has to tie into the wall layers, the work involves access to the wall and roof edge.
For a home where flashing is missing, damaged or incorrectly installed, the same guidance calls for removing the siding and any existing flashing to expose at least 8 inches of the wall, repairing any damaged sheathing or framing, installing adhered waterproofing such as an ice-and-water membrane with integrated step flashing, and then setting the kickout at the eave edge to send runoff to a gutter. The best-practice sequence it describes uses a fully adhered transition membrane, roof underlayment wrapped at least 8 inches up the sidewall, then new kickout and step flashing integrated with the shingles. It also describes counterflashing over the top edge of the step flashing, tied into the wall’s weather-resistive barrier.
What that means for you:
- Retrofit on a roof that is otherwise fine: a targeted repair at each affected corner. Siding is lifted at that spot, the flashing is rebuilt, the siding is put back.
- Retrofit during a replacement: the best moment. The roof is already open, so the whole intersection can be rebuilt as one system. If your roof is near the end of its life, our roof replacement work includes rebuilding wall intersections.
- A quick bolt-on piece slipped under existing siding: this is not what we would call a retrofit. Without integration into the water barrier, it can leave the actual leak path open.
Why flashing lifts in wind, and what to do about it
Flashing that is lifted, bent or pulled loose is common after a Louisiana storm. Flashing sits at roof edges and wall joints, which are the areas wind pushes and pulls hardest. Metal that was nailed through its exposed face, held only by old sealant, or installed without being lapped under the layer above can start to work loose. Once a corner lifts, wind-driven rain gets under it, and the next gust lifts it further.
What to do:
- Stay off the roof. A wet, wind-damaged roof is a fall risk. Look from the ground or from a ladder at the eave, not on the slope.
- Photograph what you see from the ground, including gutters, siding and any interior stains, for your records and for any insurance conversation.
- Cover active leaks inside with buckets and move belongings. If water is coming in, a temporary tarp from a roofer can limit damage until a repair is possible. Our storm damage restoration team handles tarping, and our emergency roof repairs are there for urgent leaks.
- Have the whole intersection inspected, not only the lifted piece. Wind that moves a kickout may also have loosened step flashing, shingles or siding nearby.
For more on how wind affects roofs in our area, see our wind damage roof repair guide for Louisiana. If your flashing is metal and you want to understand material choices, our guide to metal roof flashing protection goes further.
Checking whether the wall and roof need repair after a leak
A leak at a roof-wall corner rarely stays at the corner. Use this order when deciding what to repair:
- Start outside, lowest point first. Check the siding or brick below the intersection for staining, swelling or soft spots in trim.
- Check the gutter. Is it full of granules or debris, pulled away from the fascia, or overflowing at that exact spot?
- Look inside. Ceiling stains, wall discoloration, bubbling paint or a musty odor near that corner point to water entry.
- Have the wall opened if signs are present. Because damage can hide behind a clean surface, a roofer should look under the siding at the intersection rather than rely only on appearance.
- Repair the cause before the cosmetics. Fresh paint over a leaking corner just hides the problem for a season.
Our guide on how to fix a leaking roof walks through the wider picture of finding a leak source. If you are selling or buying, flashing problems commonly show up on inspection reports, and our piece on roof inspection red flags in Louisiana explains what to expect.
For a Baton Rouge-specific look at this topic, see flashing for Baton Rouge roofs.
Our perspective on kickout flashing
We see the same story again and again on Baton Rouge homes: a stain on a wall corner, a soft piece of trim, and a roof that looks perfectly fine from the street. The roof is rarely the problem. The intersection is.
Our view is that kickout flashing should never be treated as an accessory. It is part of the water path, and it only works when it is sized for Louisiana rainfall, sealed, angled correctly and tied into the wall layers above it. A piece that is bent on the job from scrap or pressed against siding with caulk may look finished, but it was not built to carry a summer downpour.
That is why we start with an honest assessment. We look at the kickout, the step flashing, the gutter and the wall together, tell you what we see in plain language, and give you options without pressure. When work is needed, we do it with meticulous detail, and our workmanship is backed by a five-year warranty. With more than 25 years of roofing experience, we have learned that the small details at roof-wall corners are where long-lasting roofs are won.
If you are unsure about a corner of your roof, a free inspection is the easiest way to know.
Get your roof-wall intersections checked
If you have staining below a roof edge, overflowing gutters at one corner, or flashing that looks bent or lifted after a storm, we can inspect it and explain what is going on. We handle repairs, full replacements and storm restoration for homes and businesses around Baton Rouge, with clear communication and no pressure.

Book a free inspection through our roof inspections page, or learn more about the roof repair services we offer. Business owners with parapet walls or roof-to-wall transitions on commercial buildings can see our commercial roofing work.
Questions homeowners ask about kickout flashing
What is kickout flashing for?
It diverts water running down the edge of a roof into the gutter, so the water does not run down the wall below. It protects siding, trim, sheathing and framing from moisture. It is installed at the lower end of roof-wall intersections.
How do I know if kickout flashing is missing?
Look at the point where a lower roof meets a taller wall. If you see no angled piece at the roof edge and the wall below is stained, or the gutter overflows there, it is likely missing or ineffective. Because damage can be hidden, a roofer should confirm by checking behind the siding.
Can kickout flashing be added later?
Yes. It can be installed as a stand-alone retrofit or during a roof replacement. A proper retrofit involves lifting the siding at the corner, rebuilding the step flashing and membrane layers, and setting the kickout so it ties into the wall barrier.
Is kickout flashing required by code?
The model residential code calls for it where a sloped roof eave meets a vertical sidewall, and many jurisdictions follow that language. Local amendments vary, so your parish or city permit office confirms what applies at your address. Our crews install it wherever the roof design calls for it.
Should I fix a lifted kickout myself?
We recommend leaving it to a roofer. Working on a wet or wind-damaged roof is a fall risk, and a correct repair requires opening the siding and integrating several layers. Call us for an inspection and, if needed, temporary protection.
Sources
- Kick-out Flashing at Roof-Wall Intersections, Building Science Education
- Step and Kick-Out Flashing at Roof-Wall Intersections, Building America Solution Center
- Flashing of Roof-Wall Intersections in Existing Homes, Building America Solution Center
- Look for Missing Roof and Wall Flashing, Building America Solution Center
- Kickout Flashing, InterNACHI
- Kickout Flashing: How to Flash Troublesome Roof-to-Wall Intersections, Fine Homebuilding
- Chapter 9 Roof Assemblies, Minnesota Residential Code 2015